

How to create and edit Articles
An Article is some written information (text and images) to be displayed in your website.
Before you can create a new Article you need a Category to put it in (see earlier in this article).
Articles can be created and edited after logging into both the website Dashboard and the Front End.
How to create an Article
Dashboard
Select the Articles button from the Site panel in your website's Dashboard.

Click the New button.

Front End
Users with special permissions (example: Administrator) can create and publish new website Articles in the Front End in two short steps.
Step 1: Sign in
Read more: How to sign into the Front End.
Step 2: Select the Create an Article link from the User Menu

In a WYNCHCO Website the User Menu is displayed by a Menu Module called Interact.
You may of course change the name of this Module.
Image shows Interact Menu Module screen in a default WYNCHCO Website Design.

How to edit an Article
Dashboard
Select the Articles button from the Site panel in your website's Dashboard.
Preview & Accessibility Check Buttons
Use the Preview Button displayed at the top of the Dashboard when editing an Article to see what the changes you have made will look like in the Front End.
Use the Accessibility Check Button to se if there are any accessibility issues arising from the changes you have made.

If the buttons are not working for any one Article in your website then the reason could be:
- the Article you wish to check is not published;
- the Article is linked to from an unpublished Menu Link;
- the Access permissions of the Article and associated Menu Link are restricted (not Public).
If you are not able to use the Preview Button shown above then use the Preview Tab at the top right of the content editor panel (assumes your website is using the JCE Content Editor).

Front End
After signing in, look for the following button.
Click an Edit Article button to begin editing an Article.

Note: if you cannot see the above button after signing in then you have not signed in as a user with special permissions.
Check your user status in the User screen of the website Dashboard.
Dashboard and Front End
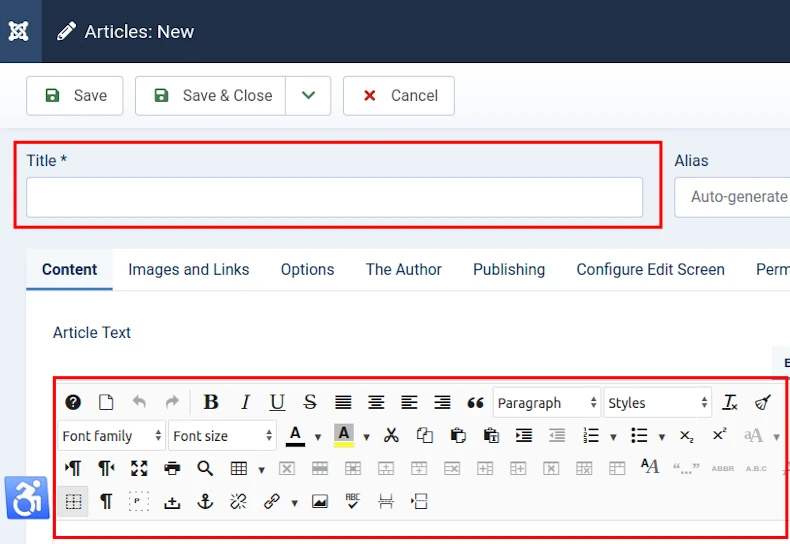
Content Tab
Left side of screen (landscape view)
Add an Article Title.
Assuming your website's default Article Options have not been changed, the Article Title you enter will be displayed in the Front End as:
- a H1 Heading when the Article is linked to from a Single Article Menu Link, and
- a H2 Heading when the Article (or its introduction) is displayed as part of a Category Blog.
Article Options can be viewed when you select the Options button at the top right of the screen when editing an Article.

After adding a Title, go ahead and insert some text and maybe an image using the Content Editor panel.
Don't add a H1 or H2 Heading at the top of the Article because the Title (see above) will be displayed as the Article's Heading.
Read more: Working with Content Editors.
Right side of screen (landscape view)
Change the settings as required for your website.
See comments below.

Status
Default = Published.
Select Unpublished if you wish to delay publishing.
You could alternatively set a future publishing date under the Publishing tab.
Category
Choose a Category for your Article.
Example: An Article called Red might be stored in a Category called Colours.
Featured
Default = No.
Select Yes to publish the Article when a Featured Articles Menu Link is clicked by a visitor (assuming one is published in your website).
Example use of a Featured Articles Menu Link = Home Page.
Access
Default = Public.
Determine who can see the Article when published.
Public means that all visitors to your website will be able to read the Article (either via a Menu Link or using the Smart Search Module).
Change the status (for example: to Registered User) to require that visitors sign in to read the Article.
Tags
Content Tags enable you to link Articles of a similar topic to one another, even when they are in different Categories.
The Tag will be displayed below the Article in the Front End.
When selected by a visitor, a list of Articles (bearing the same Tag) will be displayed.
Note
This is a really useful field if you want to focus your own or a fellow administrator's attention to how you have configured this Article.
The Note will not be published in the Front End.
Version Note
The Version Note field enables you to add a note relevant to this version of the Article.
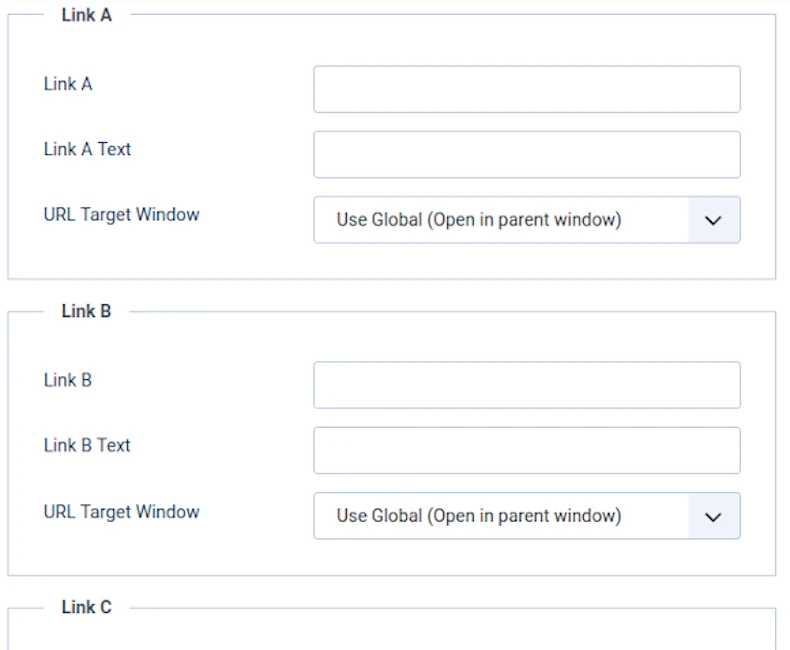
Images and Links Tab
Left side of screen (landscape view)
This tab is useful when an Article is to be displayed in two parts:
- the Article introduction + Read More (displayed when a Category Blog Menu Link is selected), and
- the Full Article (when the Read More button is selected).
We include exemplar articles showing how this works in our WYNCHCO Website Designs.
Intro Image

Full Article Image

Both Images
Always complete either the:
- Image Description (Alt Text) field (Example: flower when image is of a flower), or
- No Description check box if the image is purely decorative
when inserting images under the Images and Links tab.
Reason: to help website visitors who are visually impaired and use screen readers.
Example Use
The images below illustrate use of this tab for displaying two different image sizes:
Small Image (580px width)
To be displayed in the Article introduction (say when a Category Blog Menu Link is selected).

Large Image (800px width)
To be displayed when the Read More button is selected.

See how it works in one of our demonstration websites.
Visit: WYNCHCO Demonstration Website
Right side of screen (landscape view)
If you need help using these fields,then let us know.
Whilst we have not yet had cause to use them in our own websites, we may be able to assist.
Options Tab
The default Options settings, for almost every Article in a WYNCHCO Website Design, are assigned globally (Use Global).
You can change these global settings for all Articles at the link below.
Or you can locally change these settings for any one Article under the Option tab for the Article (see images below).


Schema Tab
When the System - Schema.org Plugin us enabled in your website then a Schema tab will be displayed in the Article screen of your website's Dashboard.
The System - Schema.org plugin is disabled by default in a WYNCHCO Website Design.
Reason: to de-clutter the Article screen.
When you are ready to create and publish Schema then first enable the plugin.
Article tabs when plugin disabled (default position)

Article tabs when plugin enabled

Fields Tab

We call the Fields tab The Author in a WYNCHCO Website Design.
More about working with Fields at the following link.
Publishing Tab
Left side of screen (landscape view)
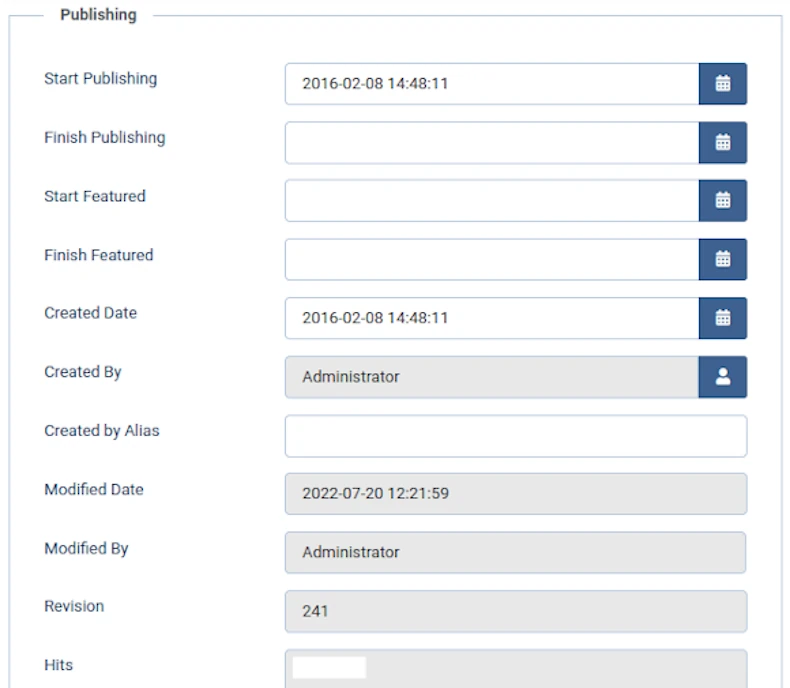
Dates
Toggle the date fields when you want to set a start and end date for your Article to be published.
Right side of screen (landscape view)

Meta Description
Using this field should help to make your Article more prominent in search engine results.
If you do nothing else, copy and paste the first sentence from your Article into this field.
Better still, make sure the first sentence includes keywords that you want the Article to be found for.
Configure Edit Screen Tab
The default Configure Edit Screen settings, for every Article in a WYNCHCO Website Design, are assigned globally (Use Global).
See image below.

You can change these global settings for all Articles when you select the Options button at the top right of the Dashboard.
See link to separate article below for more information.
Or you can locally change these settings for any one Article.
Example: Override Global Settings for an Article
The next image shows the tab for one Article when the global settings have been locally overridden.
The result: fewer visible tabs in the Article editing screen for this one Article.
The tabs will all however be visible for all other Articles because the settings have only been overridden for this one Article.

If the local settings shown in the above image had been assigned globally (for all Articles) then the Article's settings would look like this:
- Use Global (Hide).
- Use Global (Hide).
- Use Global (No).
- Use Global (No).
How to globally change Configure Edit Screen Settings
We show you how to globally change the Configure Edit Screen tab settings at the following link.
Permissions Tab

Note
We recommend NOT changing the default settings if you are not an advanced user,
To change these settings could compromise your website's security.

