


How to assign a Style Set to a Module
The Template included with a WYNCHCO Website Design includes lots of Custom Style Sets.
These Custom Style Sets can be assigned to a Module to change its appearance or determine when it is displayed depending upon the device and screen size used by a visitor.
Being able to control when a Module is displayed offers the potential for improving:
- page load speeds on small screen devices,
- performance in search engines, and
- visitor experience,
- visitor return.
Custom Style Sets may be used to either:
- hide, or
- show
a Module in response to the device and screen size being used by a visitor.
How to assign a Style Set to a Module
The process is the same regardless of Module type.
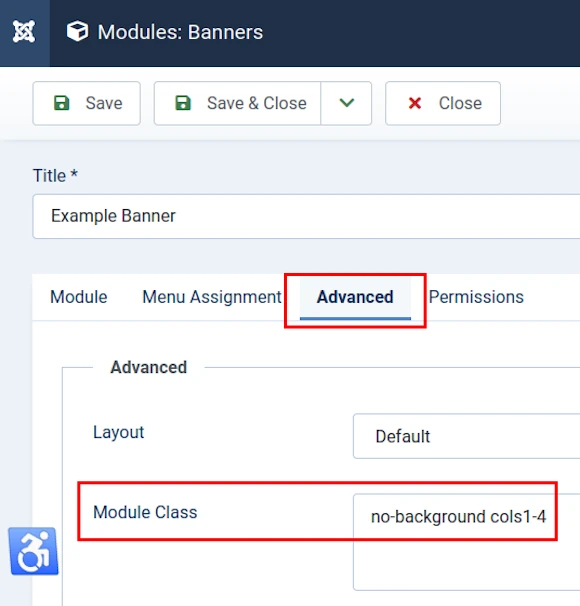
The image below shows a Banner Module.
It is easy to assign a Style Set to a Module:
- open the Module screen;
- select the Advanced tab;
- add the names of Custom Style Sets to the Module Class field;
- select Save and Close and review the change in the website Front End.
Note: when using more than one Style Set, leave a space after each one (all lower case text).
Custom Style Sets to control when Modules are displayed
Custom Style Sets can be used to determine when a Module is displayed in response to the device and screen size used by a visitor.
Visit the following link to see the range of Custom Style Sets included in a WYNCHCO Website Design for this purpose..
Read more: Control when content is displayed .
Duplicate Modules
Daunted at the prospect of assigning a Style Set?
No worries.
WYNCHCO Website Designs include exemplar content, including Modules with pre-assigned Style Sets.
Look for an existing Module that appears similar to one that you want to create.
Duplicate it.
You can then tweak its settings as required.


