


Working with Images using the JCE Image Editor - How to edit image properties

The default content editor in a Joomla! CMS website is TinyMCE.
TinyMCE is great but does not support management of media files from within the editor panel.
If you administer a website containing lots of images then consider using third party content editor extension: JCE.
Reason: it includes a versatile Image Editor.
In this article we illustrate how you can upload and work with images using the JCE Image Manager.
The developer of the JCE Content Editor offers a useful Demo website at the following link:
Simply select Log in when you visit the above Demo link.
More useful links:
JCE Content Editor Video Tutorials
How to open the JCE Image Manager
When using the JCE Content Editor you open the Image Manager by clicking the Image Manager icon.
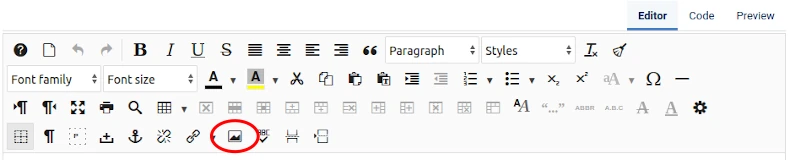
When you do a pop-up window will appear, as shown in the next image.
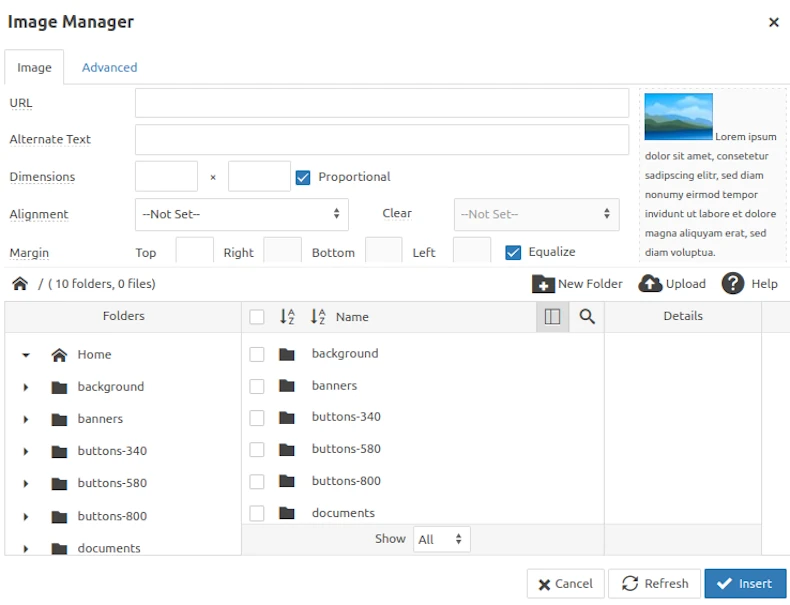
If the pop-up does not display then please check your browser settings to ensure pop-ups are enabled.
Note
The image properties may be pre-configured globally when you change the settings of any one JCE Editor Profile.
Read more: How to configure the JCE Image Manager.
Get organised
Resize, rename and reformat images before you upload them.
Also, store image originals on your computer in the same way as on the server.
Organise image files
Incorrectly named files may not load as intended when your website is viewed from older web browsers.
Later renaming of folders can cause undue extra work that is best avoided.
See below for more about naming image files.
Resize image files
You can add upload images of any size to your website.
But it makes sense to size an image according to need.
By size we mean both dimensions (pixels or PX) and memory (Kb).
All other things being equal, as image dimensions increase then so does image memory size.
We therefore recommend uploading the smallest images you can to your website.
Read more: Recommended image widths.
Method
This will depend upon your device and image editing application.
We like Linux and use the GIMP (GNU Image Manipulation Program) to resize images.
The GIMP includes a very easy to use scale tool.
Rename image files before upload
All file names should follow these rules:
- all lowercase,
- alphanumeric (letters or numbers or both),
- no spaces,
- no fancy symbols,
- describe the image content in three to four words,
- use hyphen between each word (example: fast-car.webp).
Example
Many of our customers are running Joomla! eCommerce websites.
Here is an eample of how you could rename images before upload to an eCommerce website selling shoes!
Best practice for search engines is to include three keywords in an image title.
Example:
567456.webp
could be renamed
567456.webp
but would be better named
shoes-boys-red.webp
OR
shoes-boys-red-567456.webp
if you want to quickly cross-reference to the image.
In eCommerce every product should have a unique reference number (SKU or PLU).
If you already know what these are then you could incorporate in your image names.
Example
Red Boys Shoes
Ref No 345
Image could be renamed
shoes-boys-red-345-1-567456.webp
This image would be 1 of several for product 345.
A second image could be
shoes-boys-red-345-2-567457.webp
Reformat image files
We use the WebP file format in our JOOMLERS.UK website rather than GIF, JPG or PNG.
Reasons:
- reduced page load time,
- reduced file size, and
- enhanced user experience
when compared to traditional alternative formats.
WebP is supported by most popular modern browsers, including Chrome, Firefox, Microsoft Edge, Safari, and Opera.
Contents include:
How to upload images (including drag and drop).
How to insert an image into an article.
How to edit image properties.
How to link an image.
How to delete images and folders.
How to add a caption to an image.
Assign style sets to images.
Control when images are displayed.
Image class, attributes and format
How to display round images in your website.


